
Dark Wash Ash Jeans


Found some random stretch denim in my stash (probably from SR Harris) and decided to try out the Ash Jeans. Ever since discovering the Dawn Jeans fit me like magic out of the envelope I've been wanting to give them a go, figuring they'd probably fit with minimal adjustment as well.
Since I was using mystery and likely very cheap fabric I decided to treat this first pair as a wearable muslin. Felt good about my ability to guess what adjustments I'd need based on the Dawns, and was pretty sure these would turn out fit-wise, but still wasn't keen on making an actual muslin or going all out on this pair in case my guessing was all wrong and they fit badly.
Pattern
Size
Measurements: 26" W / 36" H
Straight size 26
Hemmed at the "regular crop" length marked on the pattern.
View
Wide Leg
Removed 1.5" from the outer side seams (each leg piece, so 3" total removed per leg) and blended it into the side seam nicely to narrow the leg opening.
Notions
Button: Wawak
Topstitching Thread: Mara 70 in 448
Construction Notes
Went zoomy on the construction and while this certainly isn't my finest work, they are indeed wearable. The biggest "issues" from a construction stand point are:
- The overall topstitching quality. Honestly the topstitching all turned out pretty nice and even, it's just that I usually take a little more care to bring thread tails to the back to tie off when finishing a visible area, etc. The topstitching on the belt loops is.... Ungreat! But I wasn't about to do-over my least favorite part about jeans making on a wearable muslin 🙂 used fray check to reinforce start/stop areas as necessary.
- The fly is offset too far. I used a stashed zip that had a wider tape and wasn't paying attention so my zip is pretty deep in the extension, and now the fly is pulling open somewhat. Likely not noticeable to most people although the longer I wear them, the more it bothers me!!! But ultimately does not ruin the jeans.
I strongly prefer the Closet Core fly method. Add fly extensions to the front leg pattern pieces before cutting fabric and you're good to do it the CCP way! If you forget to add the extensions before cutting, you can cut them separately and sew them on, it just creates a little more bulk.
I also strongly prefer the full front pocket/stay that Closet Core uses. It's a simple re-draw of the pocket so it extends all the way to the fly. Instead of cutting two pocket pieces that get folded, you cut four that get sewn together. Two have the pocket curve cut out, two are the full front size/shape.
Fit Adjustments
They fit!! What a delight.
As mentioned earlier, I based these adjustments off the adjustments I made to my Dawn Jeans/shorts. Since they're by the same designer I was pretty confident that the fit would be the same as well.
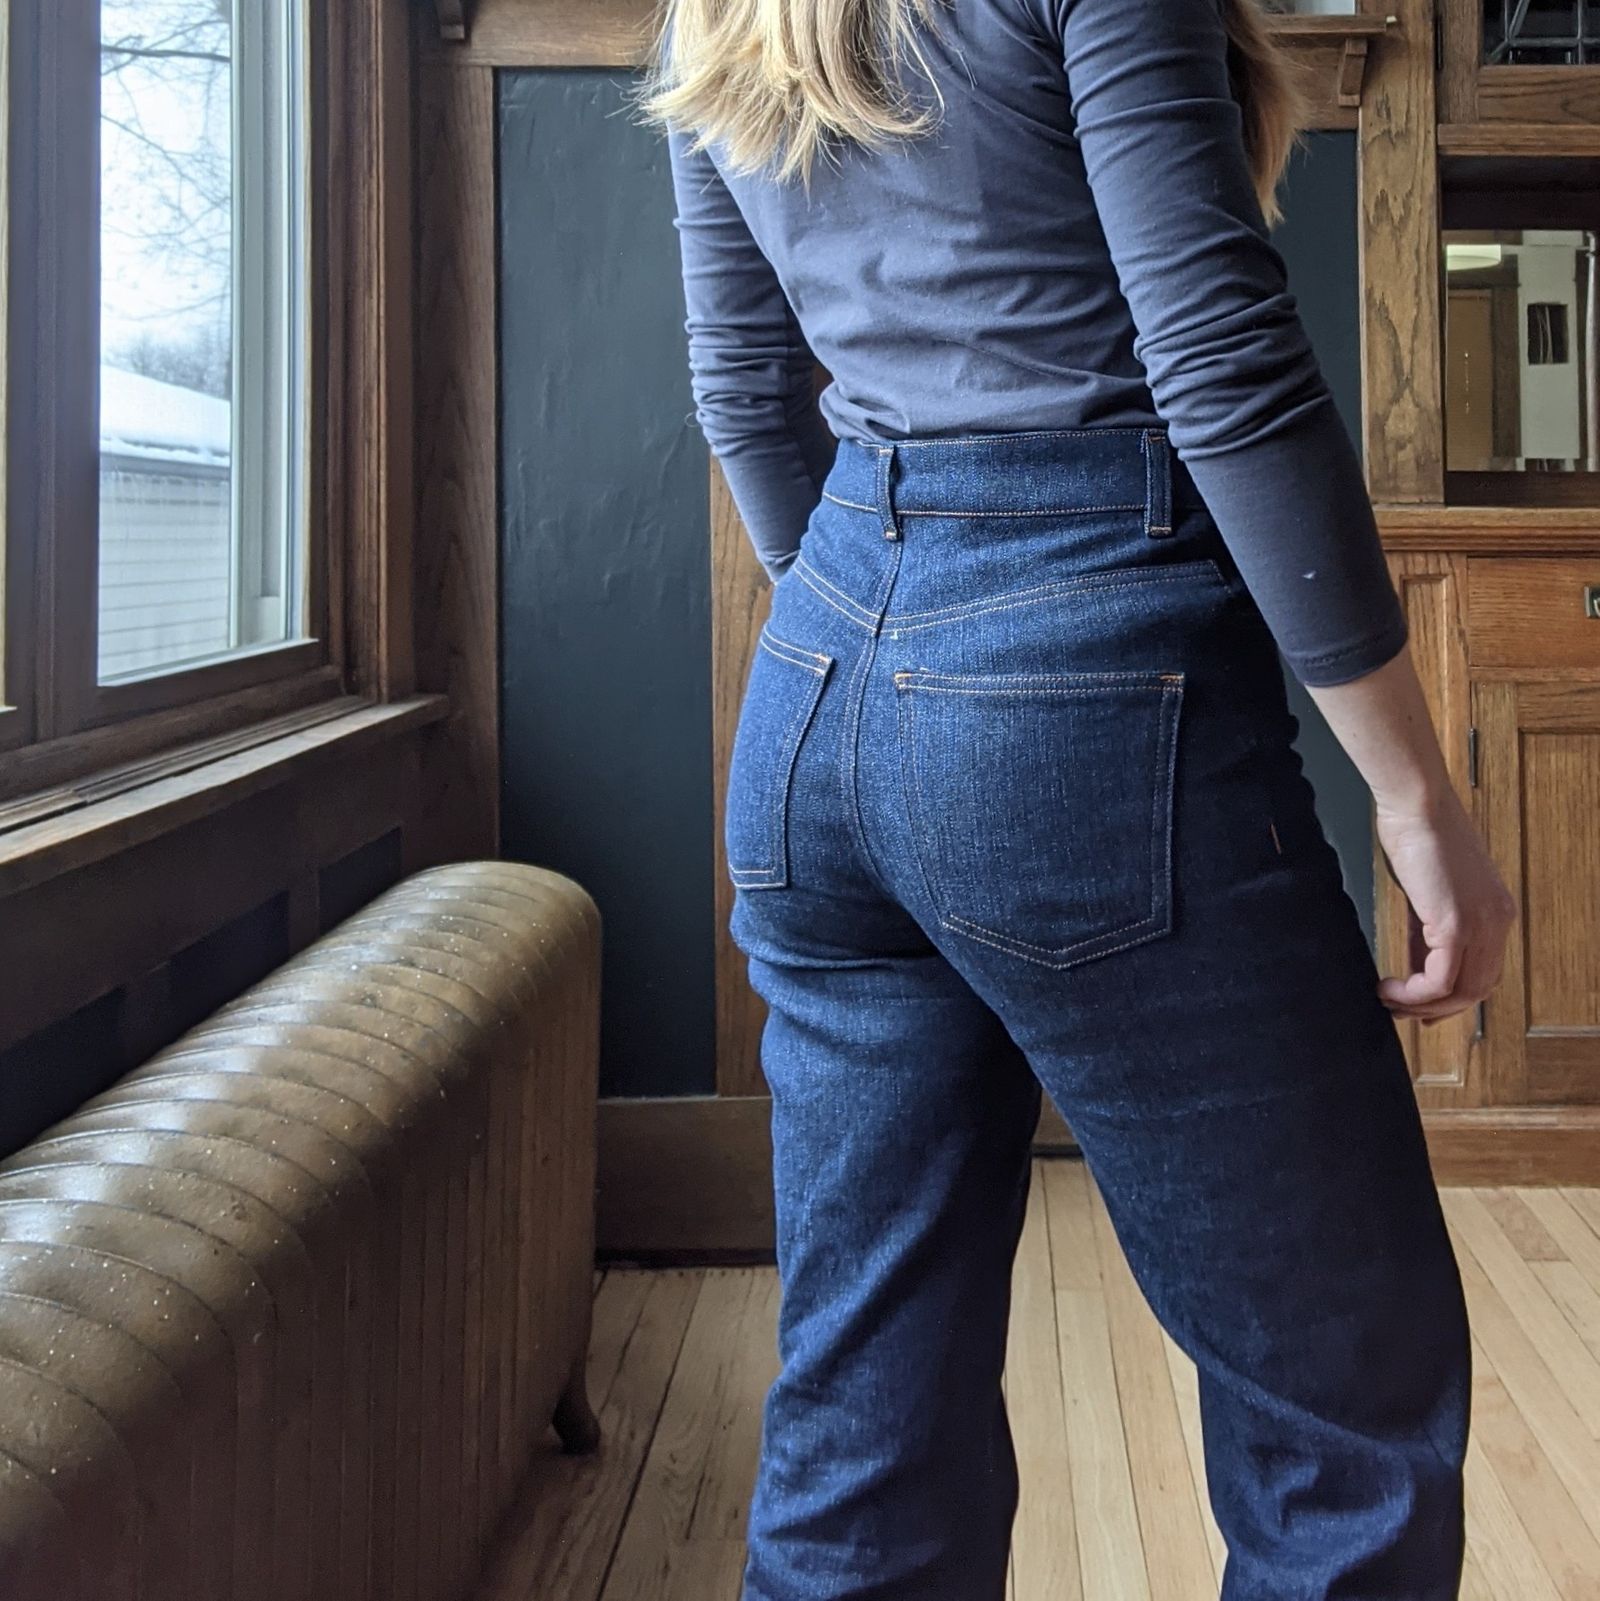
1: Scoop out the butt/angle the back crotch curve down.
2: Scooping out the butt/back crotch curve like that makes the center back seam longer. You want to get it back to the original length or you'll have issues with pooling, gaping, or an unbalanced waistband (higher in the back than in the front) at the lower back because of the extra length. Lower the top point of the CB seam (where it would meet the yoke piece) to return this seam to the original length while keeping your new back crotch/butt shape.
(Tip! If you are making this adjustment, cut the seam allowance off the center back in a long strip. Reposition it, making the shape/angle you want, making sure to keeo the crotch intersection point in the same place. Tape it down in the new position (it might be somewhat wrinkly and crinkly). Since you used the paper that is exactly the length of the original center back seam (because it literally IS the center back seam) you can just lower the top edge of the pattern piece to meet the new end point of the seam allowance strip. No wonky measuring or guesswork!)
I'm Lazy
Sewed a straight stitch across the bottom and am leaving the hem raw for now because the truth is I am lazy. Will hope it frays pretty in the wash.
Also didn't interface anything, including the waistband. Yes it maybe could use it but I was kindof hoping these would be great sweatpant jeans and I can't have a stiff waistband in sweatpants.
Aside from cutting out, I did most of the work on these in one night and an afternoon which is faster than I normally would get through jeans. I was purposefully moving quickly and consciously giving up some nice finishing/quality but overall I don't think I sacrificed that much quality wise that I couldn't realistically improve on with the same timeline. I'm not one to promote sloppy fast and lazy sewing but truthfully it felt pretty amazing to knock these out.
Next time
Might make a knock kneed adjustment? I don't think I'm particularly knock kneed, but I do think the way my calves are (bigger/wider than the "average" many patterns account for, or at least in a different vertical location) makes the leg wrinkly at the knee and below. This would hopefully help with the drag lines you can see at the outer knee.
Also could maybe use just a smidge taken out of the center back in the yoke. Like a 1cm smidge. Have little extra fabric and a slight gape at the back. Leaves a little room to tuck a shirt in though.